Let me guess, you’ve hauled that box marked “Christmas Village” down from the attic, and you’re staring at a collection of tiny houses, miniature trees, and a ceramic Santa that’s seen better days.
The urge to create something magical is strong, but where do you even start? I’ve been there.
This year, let’s move beyond just plopping them on the mantel. I’ve gathered some truly breathtaking Christmas Village Display Ideas that will transform your collection into the centerpiece of your entire Christmas decor.
Trust me, your hot cocoa will taste even better when it’s sipped in front of one of these scenes.
1. The Multi-Level Mountain Retreat
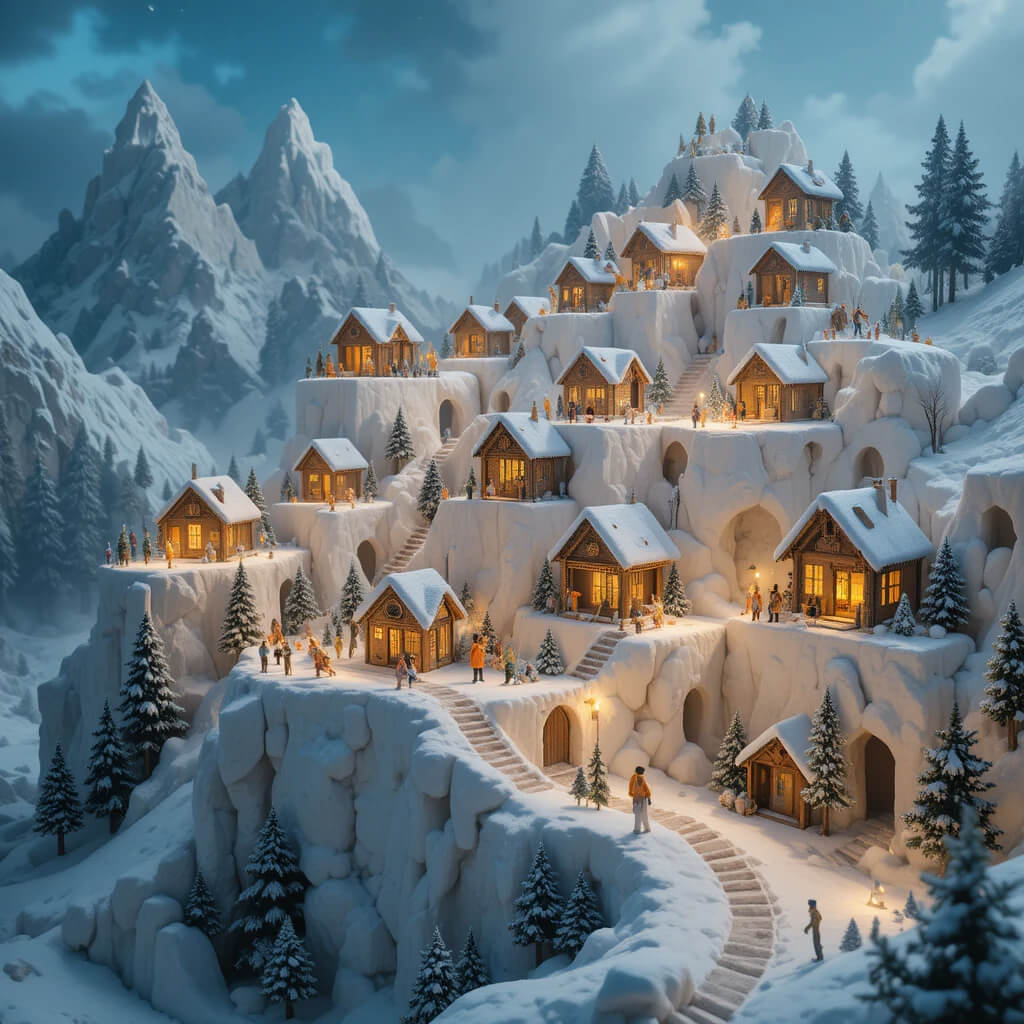
Don’t just spread your village out; build it up! Using sturdy boxes or styrofoam blocks wrapped in a simple white blanket, you can create a gorgeous, snow-covered mountain. Stagger your houses at different heights to mimic a real alpine village. It adds so much drama and uses your vertical space brilliantly.
Why it works:
- It creates incredible depth and makes a small collection look massive.
- You can hide power cords for lighted buildings easily within the “mountain.”
- It naturally draws the eye upward, making your entire display more dynamic.
- It’s a fantastic way to use those odd corners of a room.
Pro Tip: Use a hot glue gun to securely attach your buildings to the “hills.” The last thing you want is a miniature avalanche taking out your tiny town hall.
2. The Bookshelf Wonderland
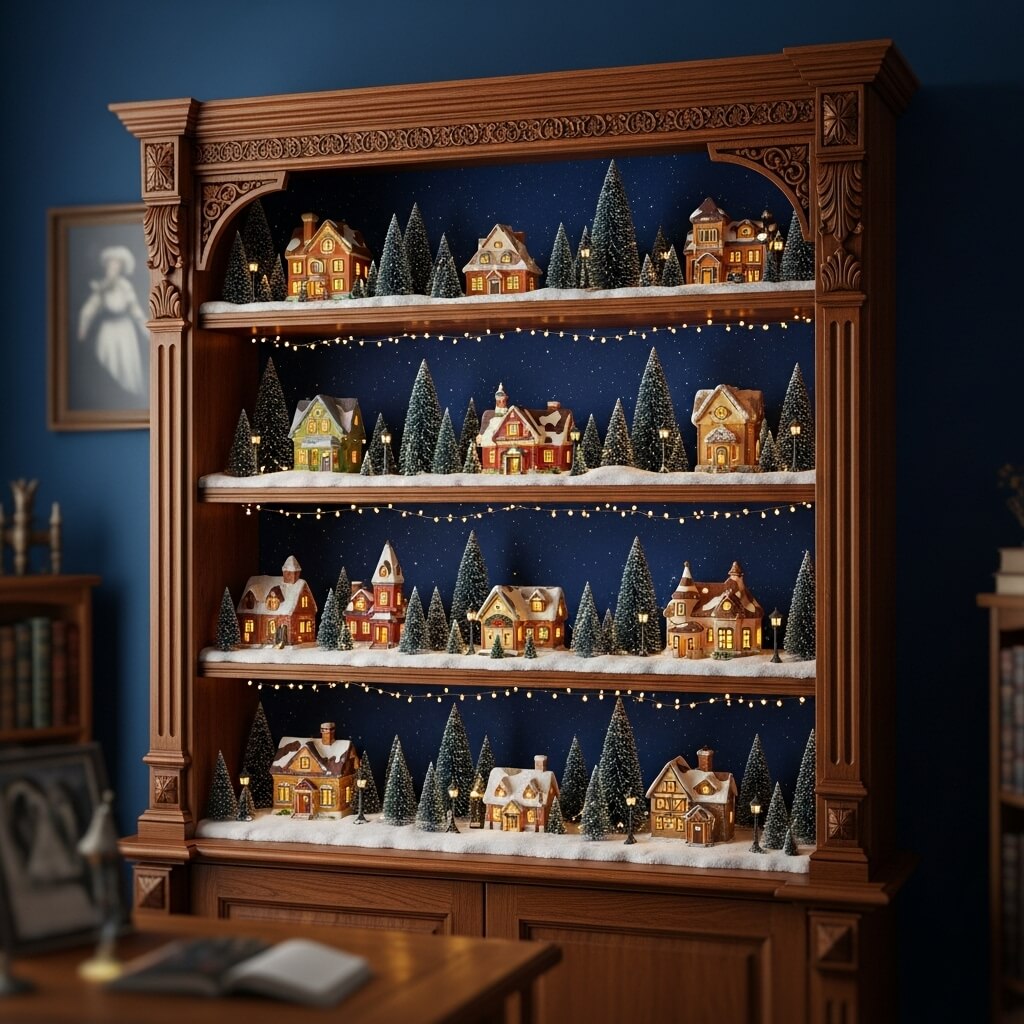
Who says your Christmas decor has to be confined to one area? Clear off a few shelves and dedicate them to your village. This works especially well with built-in bookshelves or a large entertainment center. You can create a different little scene on each shelf, telling a continuous story from top to bottom.
How to make it pop:
- Use the back of the shelf as a sky—add some dark blue paper and stick-on stars for a night effect.
- Vary the depth by placing some buildings at the very front and others further back.
- Weave a single, thin strand of fairy lights across all the shelves to unify the look.
3. The Floating Island in the Sky
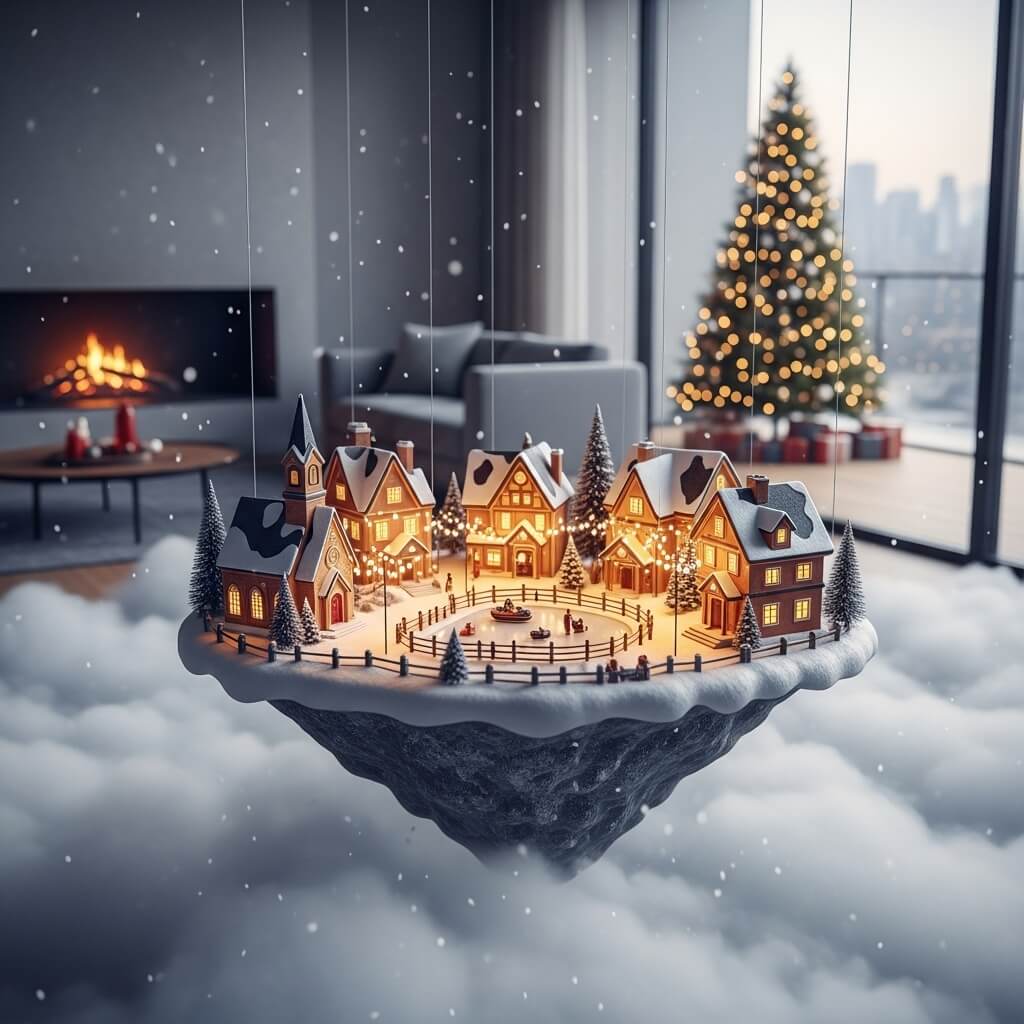
Ever wondered how to make your village look like it’s straight out of a dream? Suspend a circular piece of wood or a large, sturdy wreath form from the ceiling with clear fishing line. Build your village on this “floating island,” adding plenty of fluffy batting for clouds. It’s a pure fantasy setup that will stop everyone in their tracks.
Why it’s a must-try:
- It’s an absolute showstopper and a guaranteed conversation starter.
- Frees up every inch of your floor and table space.
- Perfect for small spaces where a traditional display isn’t feasible.
- Adds a whimsical, almost magical element to your room.
Downside: This one requires a bit more DIY confidence and a reliable ceiling hook. Maybe don’t attempt this after your third glass of eggnog.
4. The Mirror Lake Illusion
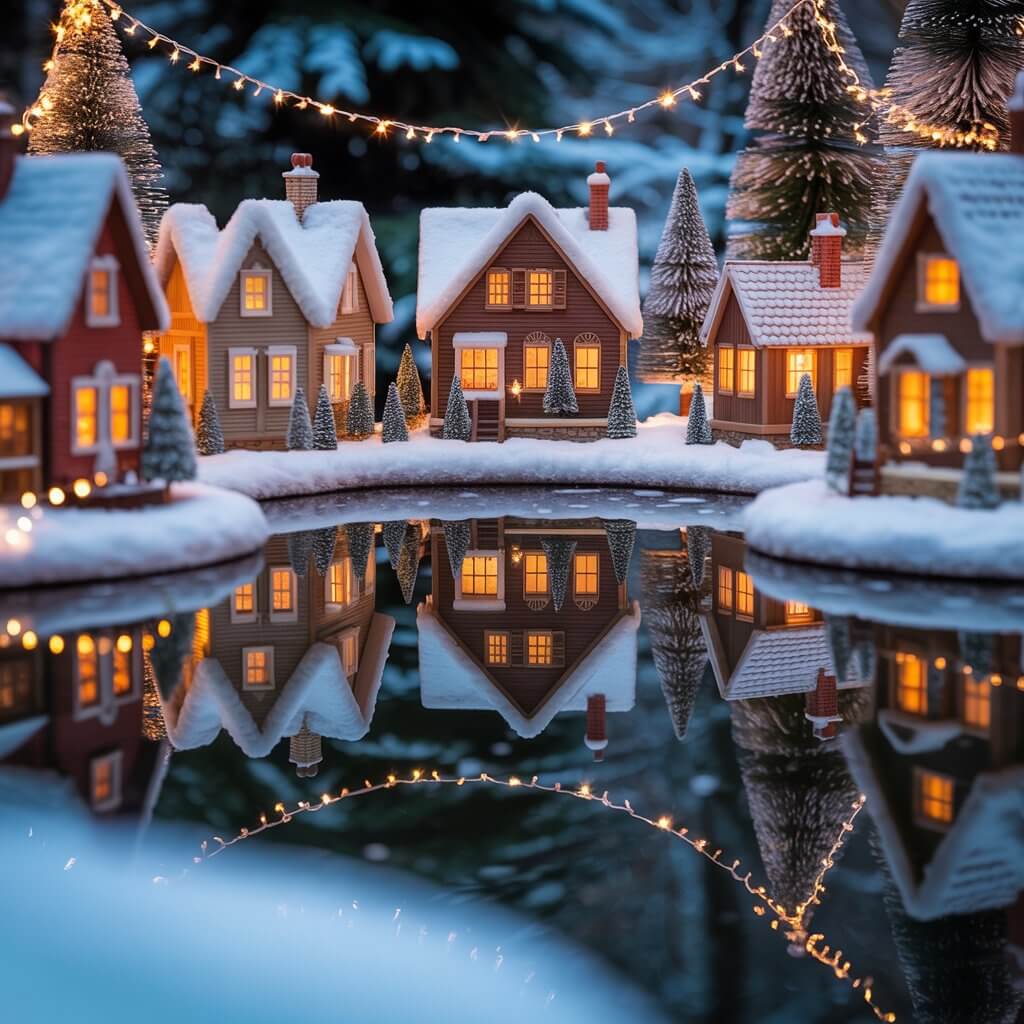
Grab a large, inexpensive mirror from a home goods store and place it as the base for your village. Instant lake! Surround it with your buildings, trees, and faux snow. The reflection doubles the impact of your lights and makes the entire scene feel larger and more luminous.
How to nail it:
- Place your light-up houses directly on the mirror for the best reflection.
- Scatter a few tiny, fake snowballs or “ice” rocks around the edge to blend the mirror into the landscape.
- A small, battery-powered flickering tea light under a tiny bridge looks incredible reflected.
Pro move: Windex is your best friend here. A pristine, fingerprint-free mirror is the key to selling the illusion of a frozen lake.
5. The Cozy Fireplace Hearth Classic
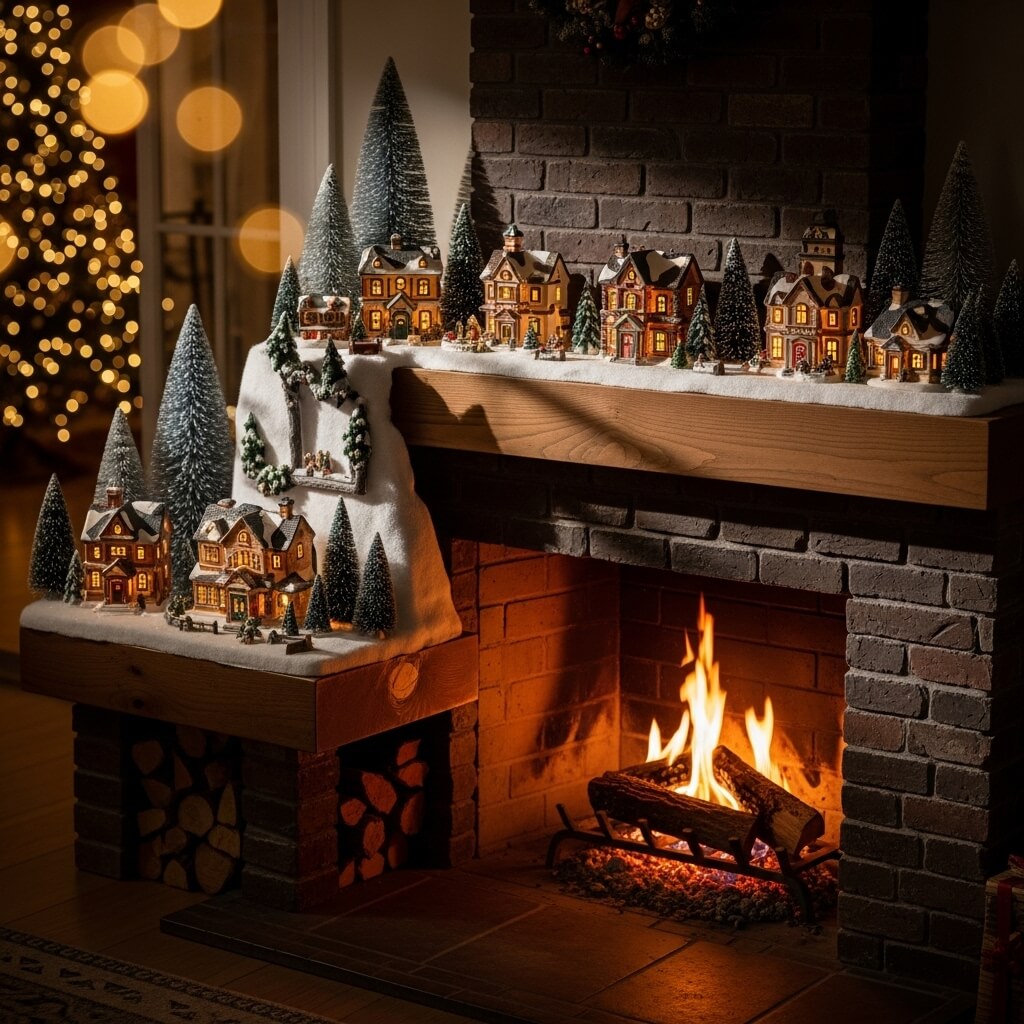
You can’t go wrong with the classic mantel display. But let’s elevate it, shall we? Instead of a straight line, create a gentle S-curve with your buildings. This simple trick makes the layout feel more organic and less like a lineup. Frame the scene with larger bottlebrush trees at either end.
Why it works:
- It utilizes a natural focal point in your home.
- The warmth from the fireplace (if you use it) adds a literal cozy glow.
- It’s a highly visible spot, allowing you to enjoy your handiwork every day.
- The setup is relatively quick and easy.
Story time: My cat once tried to become Godzilla in my mantel village. Now, a little museum putty under each building is non-negotiable. Learn from my near-disaster!
6. The Vintage Train Station Hub
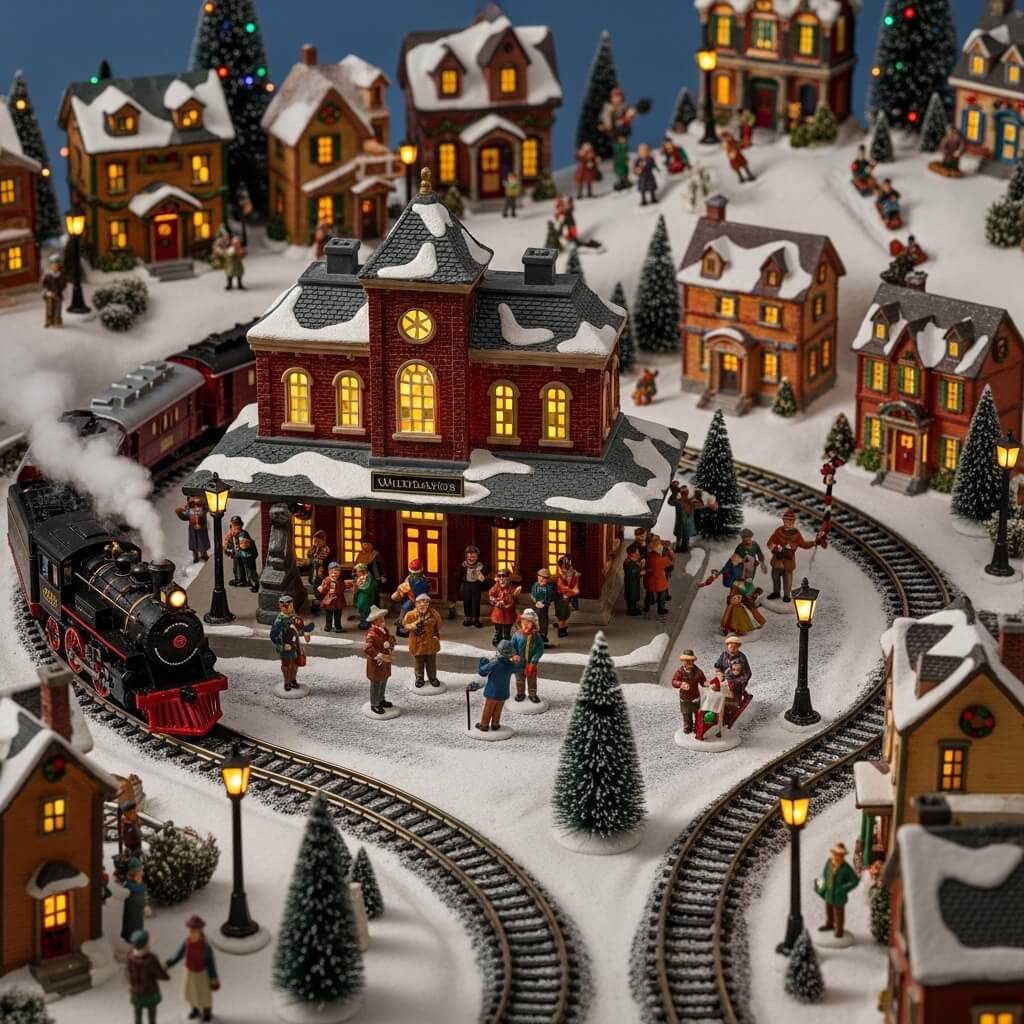
Make your train the star of the show. Build your entire village around a central train station. Create a large oval track and design the town as if it grew from that transportation hub. It gives your display a purpose and a clear narrative.
Design ideas:
- Use a small, circular mirror as a pond for the train to loop around.
- Add a “loading dock” with tiny crates and barrels next to the station.
- Incorporate a tunnel over part of the track for a cool effect.
- Position the station front and center as the main architectural feature.
Personal take: IMO, a working train brings a village to life like nothing else. The sound and motion are just next-level Christmas magic.
7. The Tiered Cake Stand Display
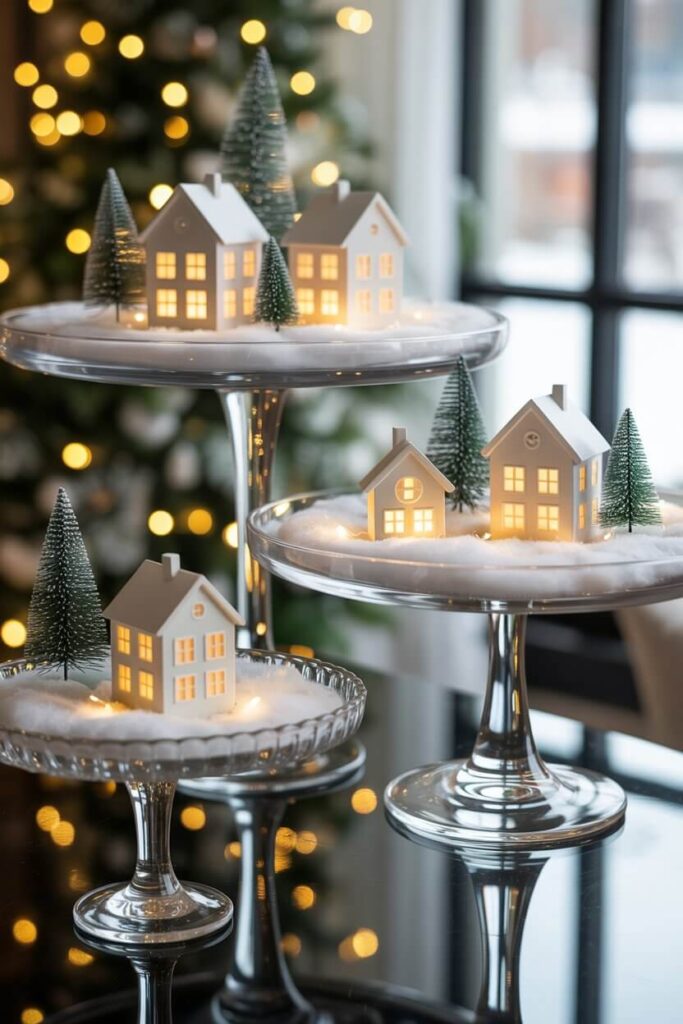
For a quick, elegant, and space-saving solution, raid your kitchen cabinets. Use two or three cake stands of varying heights. Place a house or a small vignette on each one. This creates instant levels and visual interest with almost zero effort.
Why it’s a must-try:
- It’s incredibly fast to set up and tear down.
- The raised platforms make even a single building feel important.
- You can easily rotate pieces throughout the season.
- It looks fantastic on a console table, dining table, or even as a centerpiece.
Pro Tip: If your cake stands are glass, sprinkle a little faux snow on them first to hide the base and create a seamless snowy look.
8. The Night-Sky Backdrop
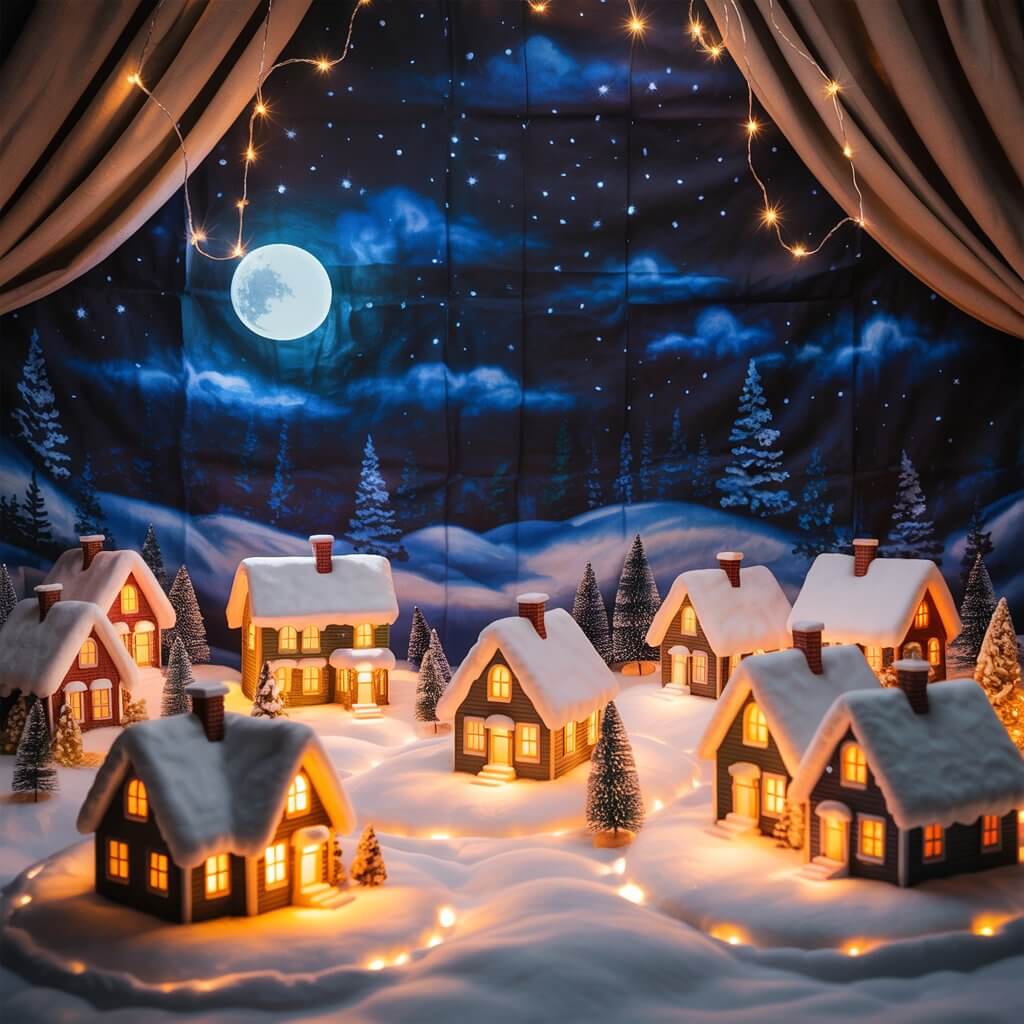
This one change will revolutionize your display. Ditch the plain wall behind your village. Instead, use a piece of black poster board or fabric and create a night sky. You can glue on star sequins, use a white gel pen to draw constellations, or even project a subtle starry night onto it.
How to create the effect:
- A string of tiny, white fairy lights poked through the black fabric creates a stunning twinkling effect.
- Cut a small, yellow paper circle and place it behind a mountain for a rising moon.
- Keep the backdrop a few inches behind your village to enhance the feeling of depth.
Personal fave: I painted a simple, swirling galaxy on my backdrop last year. It took 20 minutes and made the whole scene look amazing.
9. The Winter Forest Foray
Maybe your building collection is a bit… sparse. No worries! Focus on the landscape. Gather a bunch of inexpensive faux pine trees of different sizes and densities. Create a dense forest, and then tuck your one or two cabins into the trees, as if they’re hiding in the wilderness.
Why it works:
- It’s a budget-friendly way to create a lush, full display with fewer buildings.
- It evokes a quiet, peaceful, and cozy winter feeling.
- You can use sprigs of real evergreen clippings for a wonderful scent.
- It’s a great way to showcase a favorite lone building.
Pro move: Clump your trees together in groups of three or five instead of spacing them evenly. This looks much more natural, I promise.
10. The Dickensian Downtown

Go for a specific theme to tell a story. Create a classic Charles Dickens-inspired scene, all cobblestone streets and old-world shopfronts. Focus on pieces like a bustling town square, a humble church, and shops with detailed facades.
How to set the scene:
- Use printed cobblestone paper or fabric for your streets.
- Populate the scene with lots of tiny people and horse-drawn carriages.
- Incorporate a central clock tower or a large, ornate fountain as a focal point.
- Stick to a more muted, traditional color palette.
Story time: I once found a tiny figure of a boy carrying a Christmas goose, and building a scene around him became my favorite holiday project. It’s all in the details!
11. The Fun Candy Land
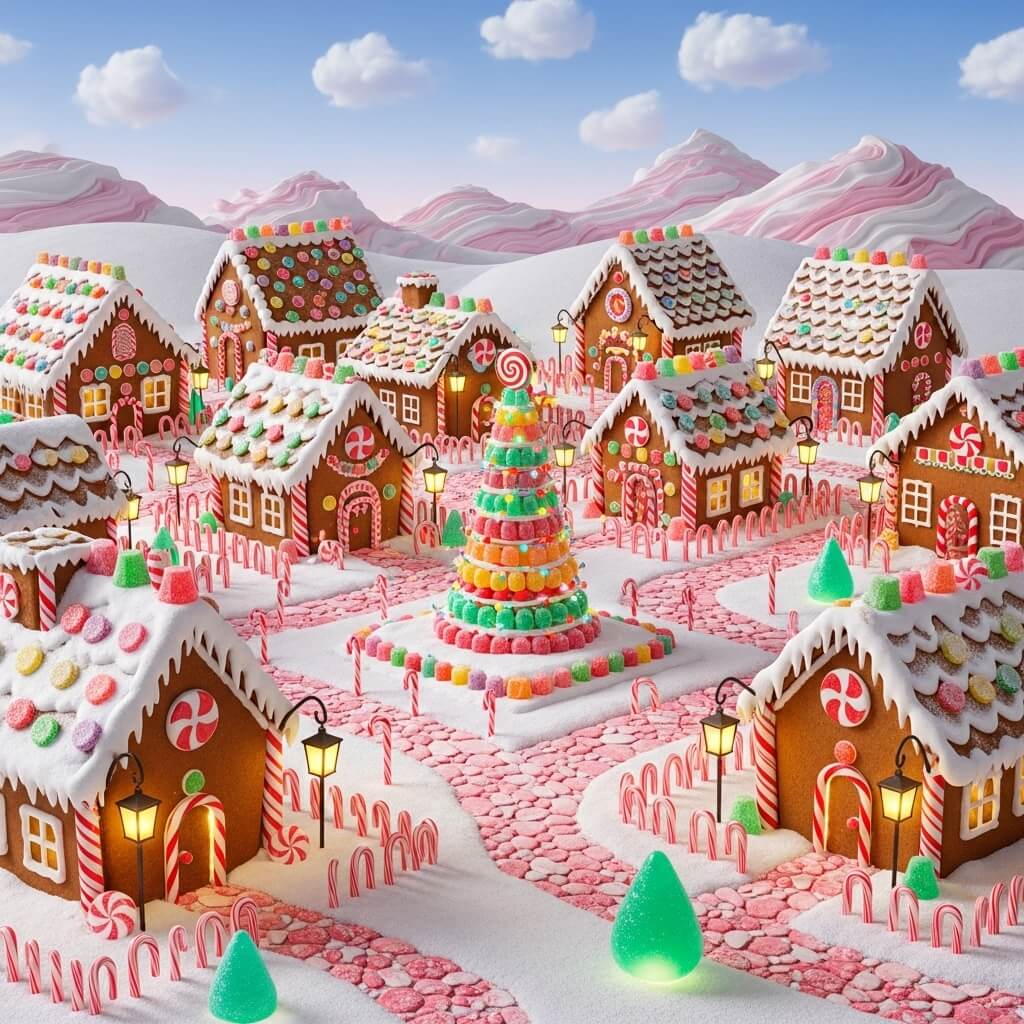
Who says a Christmas village has to be realistic? Unleash your inner child and create a candy-themed wonderland. Use striped candy canes as lamp posts, scatter colorful gumdrops and peppermints, and maybe even include a house that looks like it’s made of gingerbread.
Why it’s a must-try:
- It’s an absolute joy to create and is a huge hit with kids.
- You can use real, sealed candy as part of the decor (just replace it if it gets dusty).
- It allows for bright, cheerful colors that pop against the white snow.
- It’s a fun twist on tradition that shows off your personality.
Downside: You will crave sugar the entire time you’re building this. Consider yourself warned.
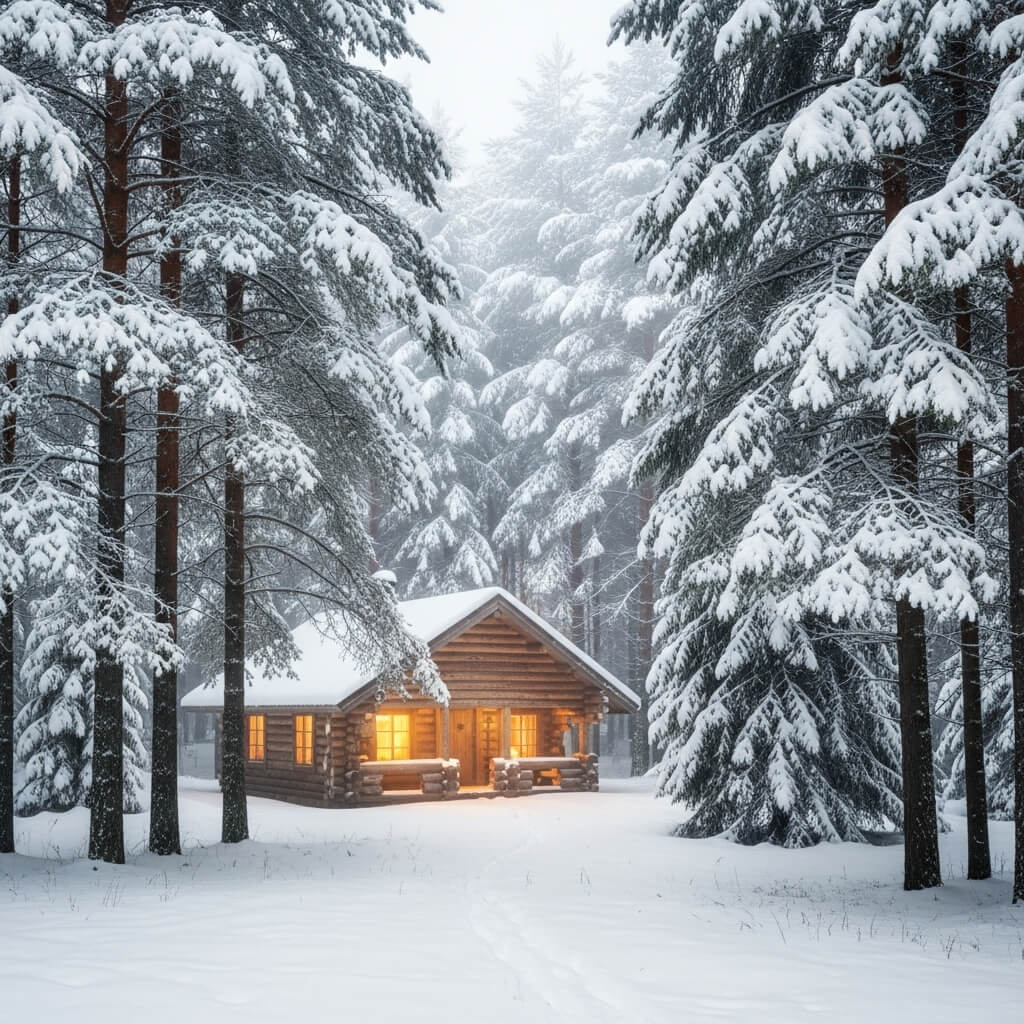
12. The Rustic Woodland Cabin Vibe

Embrace the cozy cabin aesthetic. Use pieces like log cabins, a woodcutter’s shed, and a rustic chapel. For the base, use a piece of faux fur or a burlap runner to mimic the forest floor instead of pure white snow.
How to create the look:
- Incorporate natural elements like pinecones, birch logs, and moss.
- Use a small, battery-operated flickering LED light inside a jar to create a campfire.
- Add miniature woodland animal figures like deer and foxes.
- Keep the lighting warm and soft to enhance the cozy feel.
Personal take: This is my go-to for creating a super cozy, hygge feeling in my living room. It’s less formal and just feels so warm and inviting.
13. The Illuminated Window Vignette
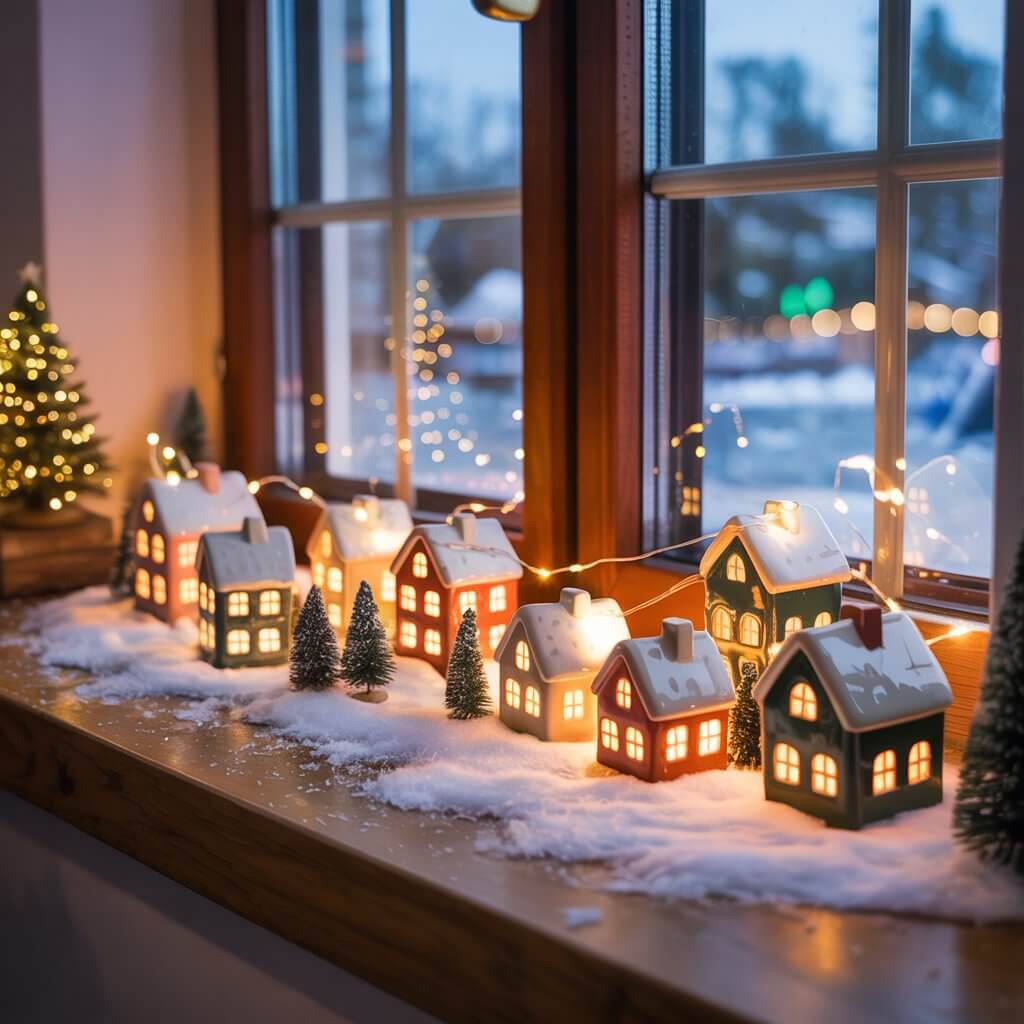
Don’t have a lot of room? Frame a perfect little scene in your window for both you and your neighbors to enjoy. Use a small shelf or even the windowsill itself. The dark window glass at night will act as a perfect backdrop, making the lights from your village sparkle.
Why it works:
- It brings festive cheer to the outside of your home without any major outdoor Christmas decor.
- The natural darkness of night makes a few buildings look incredibly impactful.
- It’s a simple way to enjoy your village from both inside and out.
- It saves you tons of precious interior table space.
Pro Tip: Use a timer for the lights! This way, your beautiful vignette turns on automatically at dusk, and you don’t have to remember to fiddle with it.
14. The Shadowbox Depth Masterpiece
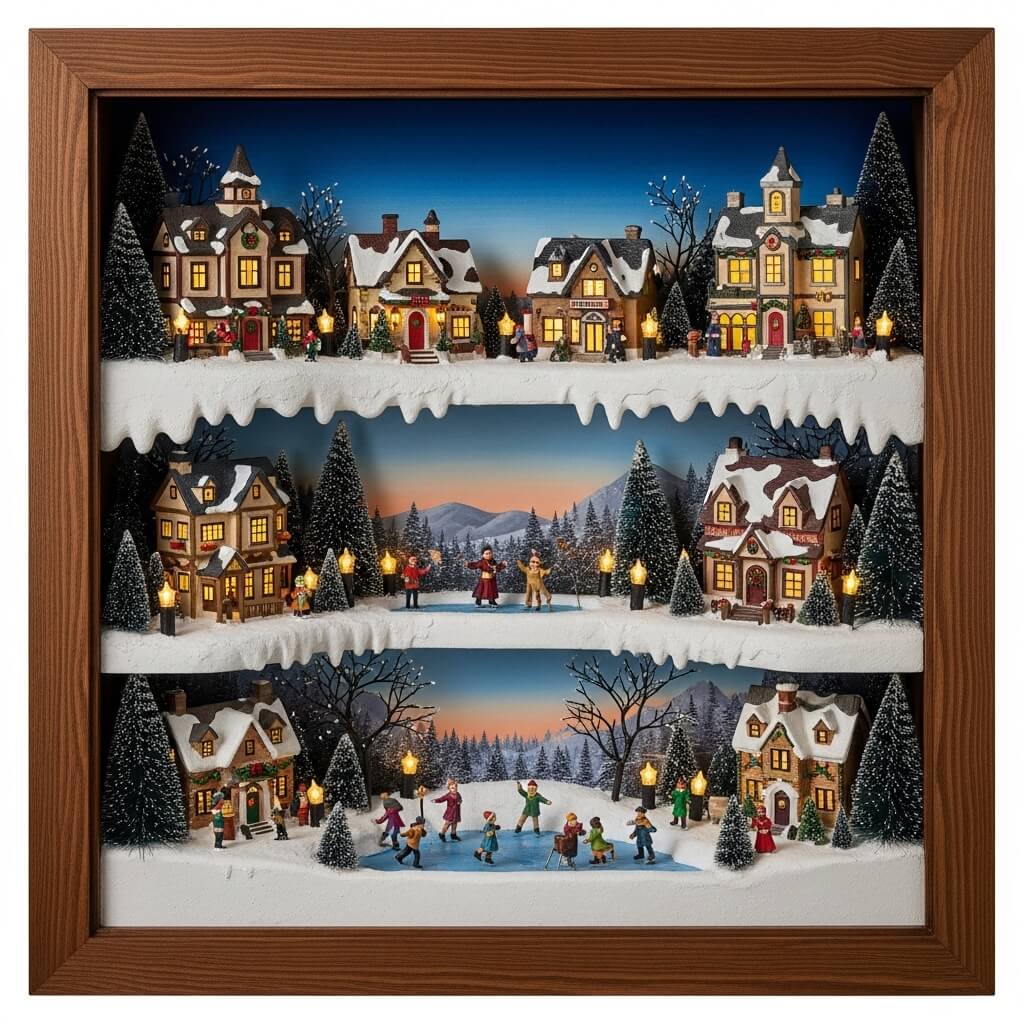
For the ultimate in controlled, artistic displays, use a large, deep shadowbox or a repurposed cabinet. This lets you build a multi-layered, detailed diorama that is protected from dust, pets, and curious hands. You can even secure the door and hang it on the wall!
How to master it:
- Build your layers from the back of the box forward, starting with a painted backdrop.
- Use small LED puck lights attached to the top of the box to illuminate the scene perfectly.
- This is the perfect format for telling a very specific, contained story.
- You can get incredibly detailed with landscaping and tiny accessories.
Pro move: Attach your background scenery to the back of the box, but leave your buildings and trees free-standing. This allows you to change the scene slightly every year without starting from scratch.
Wrap Up
So, there you have it! A whole sleigh-load of inspiration to make your Christmas Village Display Ideas the talk of the town this year.
The real magic of your Christmas decor isn’t about having the most pieces or the most expensive set; it’s about telling a story and creating a little world that brings you joy.
Don’t be afraid to mix and match these ideas or let one of them spark a concept that is uniquely yours. Maybe you’ll build a multi-level mountain on your bookshelf, or perhaps a floating island is more your style.
The goal is to have fun with it and create something that makes you stop and smile every time you walk by.
I’d love to hear which idea you’re most excited to try. Drop me a comment below and let me know what you’re building!
Happy Holidays! and Happy decorating!