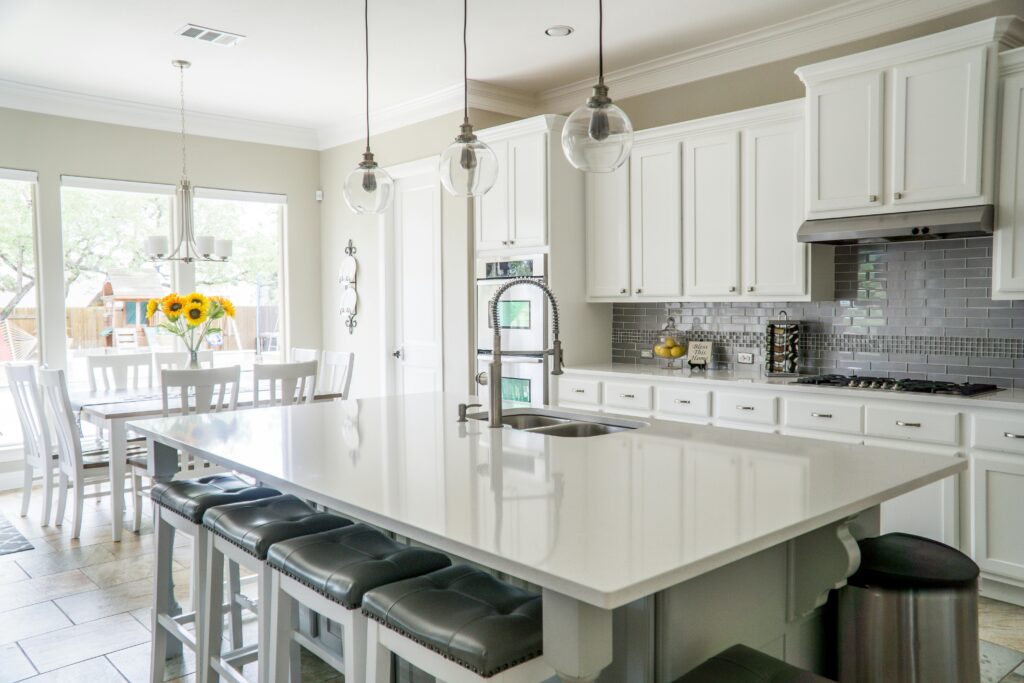
Finding the perfect lighting for your kitchen island can feel a bit like searching for a unicorn in a haystack. Here’s the thing, if you slap on the wrong lighting, it’ll look more like a middle-school talent show than a Grammy performance.
Been there, done that, bought the tragically dim pendant. Trust me, you don’t want your guests squinting at their avocado toast wondering if they’ve started developing optical issues.
So, let’s talk about how to nail kitchen island lighting without turning your space into a DIY fail compilation.
Quick confession: My first kitchen island had a single builder-grade flush mount ceiling light. It was so bland, even my cat refused to sit under it.
Why Kitchen Island Lighting Matters (Spoiler: It’s Not Just About Looks)

Your kitchen island isn’t just where you chop carrots, it’s a multitasking beast. Homework central, wine-tasting HQ, midnight snack station… the list goes on. Your lighting needs to keep up. Here’s the breakdown:
- Task Lighting: Bright, focused light for not slicing your finger off. Think under-cabinet strips or downlight-focused pendants.
- Ambient Lighting: Soft, overall glow to keep things cozy (and hide the crumbs). Recessed ceiling lights or dimmable chandeliers work here.
- Accent Lighting: The “cherry on top” to highlight your fancy marble countertop or that artisanal fruit bowl. Try LED tape lights under the island overhang or directional spotlights.
Pro Tip: Layer these three types. Think of it like a Netflix binge—you need the main show (task), the moody soundtrack (ambient), and the Easter eggs (accent) to make it epic.
But wait, there’s a catch. Too much task lighting turns your kitchen into an interrogation room. Too little? Congrats, you’ve recreated the ambiance of a haunted Victorian cellar. Balance is key.
My Big Mistake (And How You Can Avoid It)

Once, I installed a single, ultra-modern pendant over my island. Looked sleek… until I tried julienning a zucchini. Let’s just say my knife skills suffered. Lesson learned: style does not equal functionality. You need a balance.
Here’s the fix:
- Start with task lighting. Measure your workspace and ensure every inch is covered.
- Add ambient fixtures around the island (ceiling lights, wall sconces).
- Use accent lighting sparingly—like highlighting that $200 cutting board you “totally needed.”
How to Pick the Right Size and Layout

Measure Twice, Buy Once
Considering size is critical when it comes to kitchen island lighting. A tiny fixture over a massive island looks like a hat on a giraffe. Here’s the golden rule:
- Length: Your lighting should be ⅓ to ⅔ the length of your island. For a 6-foot island, aim for 2–4 feet of total lighting.
- Height: Hang fixtures 30–36 inches above the countertop (unless you’re Shaq—adjust accordingly). Too low and you’ll bonk your head; too high and it’s just sad.
- Spacing: For multiple pendants, leave 18–24 inches between them. Clustering them like grapes on a vine? Big no-no.
FYI: Got a 6-foot island? Two 14-inch-wide pendants = chef’s kiss. But if your island’s 8+ feet, consider a linear fixture or three larger pendants.
Pro Tip for Odd Spaces:
- L-Shaped Islands: Use two separate lighting zones (e.g., pendants over the prep area, recessed lights over seating).
- Curved Islands: Follow the curve with a flexible track light or a custom linear fixture.
The “Rule of Three” Magic
Three’s a crowd? Not here. Odd numbers create visual harmony. Try:
- Three mini pendants in a row (spaced evenly, not haphazardly).
- A trio of staggered drum shades at varying heights (bonus: adds dimension).
- One statement linear fixture (it counts as “one” but covers the whole island).
But wait—if your island’s shorter than 4 feet, stick to one or two fixtures. You’re not lighting a runway.
Style: Matchy-Matchy vs. Mixology

Your lighting should vibe with your kitchen’s aesthetic, but don’t be afraid to shake things up. Examples:
- Modern Kitchen: Go for geometric shapes (hexagons, spheres) or industrial metals like brushed nickel.
- Farmhouse Vibes: Try mason jar pendants, wrought-iron chandeliers, or reclaimed wood fixtures.
- Eclectic Spaces: Mix materials! A wood-and-brass combo says, “I’m fun but sophisticated.”
IMO: Mixing styles keeps things interesting. Just don’t pair a crystal chandelier with a neon “EAT” sign. Unless you’re going for “Las Vegas diner.”
Case Study: My friend’s kitchen has Shaker cabinets (classic) with atomic-age starburst pendants (retro). It’s like Mad Men meets Fixer Upper—and it works.
Finish Strong
The finish can make or break your look. Quick cheat sheet:
- Brass/Gold: Warm, luxe, very trendy. Pairs well with white or navy cabinets.
- Matte Black: Edgy, modern, hides fingerprints (parenting win). Perfect for monochrome kitchens.
- Polished Nickel: Timeless, works with everything except your ex’s drama.
- Mixed Metals: Yes, you can! Just keep one metal dominant (e.g., 70% brass, 30% black).
Types of Fixtures: From Pendants to Chandeliers
Pendants: The MVPs

Pendants are the jeans-and-tee of lighting—versatile and always in style. Popular options:
- Mini Pendants: Perfect for small islands or clusters. Go for clear glass if you want maximum light.
- Drum Shades: Clean lines, diffuse light beautifully. Fabric shades soften glare; metal amps up drama.
- Glass Globes: Bright, airy, and impossible to hate. Ideal for minimalist or coastal kitchens.
Hot Take: Avoid overly ornate designs. You’re not auditioning for The Crown.
Pro Tip: For open-concept spaces, match your pendant style to the dining room chandelier. It’s like siblings, not twins.
Linear Suspension Lights

These long, horizontal fixtures scream “I’ve got my life together.” Ideal for:
- Extra-long islands (8+ feet)
- Modern/minimalist kitchens (think: handleless cabinets, quartz countertops)
- People who hate dusting multiple pendants (guilty)
Styles to Try:
- Edison Bulb Linear Lights: Industrial vibe, great for lofts.
- Sleek Metal Tubes: Tailored and futuristic.
- Wooden Beams: Rustic charm for farmhouse lovers.
Chandeliers (Yes, Really)

If your kitchen is a fancy one, a small chandelier adds drama. Just keep it proportionate and not dripping with crystals (unless you’re Marie Antoinette).
When It Works:
- Over islands in formal, traditional kitchens.
- In kitchens with vaulted ceilings (balance the vertical space).
- If your island doubles as a breakfast bar (brunch + chandeliers = instant glam).
Installation Tips That Won’t Electrocute You

DIY or Call a Pro?
Rewiring a fixture? Easy. Cutting into the ceiling? Nope. Know your limits:
- DIY-Friendly: Swapping out a pendant, installing plug-in under-cabinet lights.
- Call a Pro: Adding new wiring, installing hardwired dimmers, anything involving a ladder taller than you.
Story Time: A friend once tried installing a pendant without turning off the breaker. Outcome: Her hair looked amazing standing on end.
Dimmer Switches: Your Secret Weapon
Dimmers let you pivot from “morning coffee” to “date night” vibes instantly. Bold move: Install smart bulbs you control via phone. Bonus: yell “Alexa, romantic lighting!” to impress your partner.
Types of Dimmers:
- Rotary Dimmers: Old-school but reliable.
- Slide Dimmers: Sleek and modern.
- Smart Dimmers: Adjust via app or voice. Set schedules like “7 PM: Dinner Party Mode.”
Pro Tip: Not all LEDs are dimmable. Check the packaging, unless you enjoy flicker-induced migraines.
Bulbs Matter (Seriously)

The bulb you use for your kitchen island lighting is key. You could drop $500 on a designer pendant, but if you pair it with a bulb that emits the same harsh glare as a dentist’s office, what’s the point?
Skip the “soft white” vs. “daylight” debate. Here’s the cheat code:
- 2700K–3000K: Warm, cozy light for ambient vibes.
- 3500K–4000K: Bright, crisp light for task areas.
- CRI >90: Ensures colors look accurate (vital for food prep).
Translation: Buy bulbs labeled “bright white” for task zones and “warm white” for ambiance.
Final Thoughts: Don’t Overthink It

At the end of the day, lighting should make your kitchen feel like yours. So, if you love that quirky UFO-shaped pendant, rock it. Worst case? You swap it out later.
Just promise me one thing: no fluorescent tube lights. Your kitchen deserves better.
Parting Wisdom: Lighting is the easiest way to elevate a space without ripping out cabinets or selling a kidney for marble countertops. Start small, experiment, and remember, you’re not stuck with your choices forever.
Now go forth and shine (literally). And hey, if you nail this, maybe you’ll finally win that argument about who’s the “designated home improver” in your relationship.
In that case, share with us some photos of your glamorous creation.